Tuesday 30 June 2009

Office 2010 - Outlook

Part 8 – Outlook – Account Setup


Since the 2007 version of Office was released Outlook was available as a stand-alone program, previously it could only be bought as part of the Microsoft Office suite. When I say “stand-alone” it might not be the most appropriate term as Outlook works best when in concurrence with other applications and or devices, everything from Skype to Mobile phones.

At the moment there is an online campaign (mostly Twitter based) by Outlook users who think the new 2010 version should HTML rendering as opposed to the one it does use (Microsoft Office Word rendering engine).

The arguments and opinions can be found/followed here at fixoutlook and the opposing view here from Microsoft’ bloggers here at msdn blogs.

Although my opinion is mixed I do like the use of, or at least the option of using; SmartArt, text editing, formatting and drawing tools that being integrated with Word brings. You would have to be little short of a genius (IT wise) to do the same in html.

What html rendering will mean are CSS (Cascading Style Sheets) compatibility and thus a better class of advertising in your inbox.

Account Setup


Click Next >


Yes


Fill in your name, email account and password. Select "Manually configure server settings or additional server types"


Internet email


For gmail, in this case I've selected imap (some email providers use Pop3). imap.gmail.com and smtp.gmail.com. For User Name use the full address (for Yahoo, etc.. They use username only without @wherever.com). Then click More Settings.


Outgoing Server select "My outgoing server (SMTP) requires authentication" and "Use same setting as my incoming mail server". Go to Advanced.


Incoming server (IMAP): 995, encryption TSL

Outgoing server (SMTP): 587 encryption SSL, Ok


Click Finish and it's done.

Next, Outlook continued


Monday 29 June 2009

Office 2010 – Excel II

Part 7 – Excel 14 (Overview continued)

I will go through the remaining Tabs listing their Groups but not all the functions of each group command. There is only one additional option; since Office 2007, apart from those mentioned in Part – 6, so I’ll just quickly run through the rest of the Tabs’ Groups.

Page Layout Groups:

  • Themes
  • Page Setup
  • Scale to fit
  • Sheet Options
  • Arrange

Formulas Groups:

  • Function Library
  • Defined Names
  • Formula Auditing
  • Calculation


In the Function Library>More Functions there’s an additional dropdown list ‘Compatibility’ which has 36 new functions (some are visible in the screenshot).


Data Groups:

  • Get External Data
  • Connections
  • Sort & Filter
  • Data Tools
  • Outline


Review Groups:

  • Proofing
  • Language (New)
  • Comments

Changes Language has simply been taken from the Proofing Group and given its own group.


View Groups:

  • Workbook Views
  • Show
  • Zoom
  • Window
  • Macros


Add-Ins Group:

  • Custom Toolbars


One thing I didn’t mention before it the tiny upward pointing arrow next to the ‘?’ help sign. Used for hiding the Ribbon, previously accessible from the Quick Access Toolbar dropdown menu.


Next Part - 8 Outlook


iJustine

This has nothing to do with Office 2010 but I want to see
how videos look on here. And this is my favorite iJustine vid.


Looks pretty good...

Sunday 28 June 2009

Office 2010 – Excel

Part 6 – Excel 14 (Overview)
I’ve seen a lot of news stories about Outlook towards the end of last week. Outlook is next on my list of Office 2010 applications, followed by OneNote, SharePoint Workspace, InfoPath, PowerPoint and Publisher.

Access 2010 is a program, like Excel, which I intend to cover in depth. At this moment I haven’t yet decided at which point to insert it.

The Outlook ‘overview’ will include trying Paul Allen’s Xiant (Wish I knew how to pronounce it, they say “zeye-ant” which will probably help some, oh well).

There will be a later, in depth, complete and informative post about working with Excel 14 when all the other Office 2010 applications have been given an overview.

Microsoft Office Excel 14

I can’t think about Excel without thinking about the origins of Microsoft, the development of their operating systems or the genius behind it. Excel 2010 has to be good. Excuses are not allowed.

Whatever version we use or have used its proper name is Microsoft Office Excel. Basically it’s a spreadsheet application distributed by Microsoft for Windows and Mac. In 1982 its original name was Multiplan (which sounds like something to do with well organised kitchens).

In its early days it struggled with the popular Lotus 1-2-3. You could call it Microsoft Office Excel or Microsoft Excel but not just Excel (Excel as a name was already being used by finance based software in the early 90’s and was the target of a lawsuit over proprietorship of the name. Microsoft eventually bought the name so today we can call it anything we want, within reason).

The Office Button in Excel, like in other Office applications, was once the file dropdown menu; in Office 2007 it still dropped but now it opens its own page. If, like me, you like the aesthetic values of things and not only their functionality then you’ll enjoy clicking on the new Office Button.
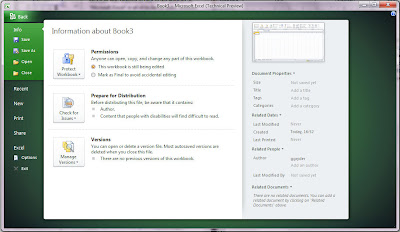

New


Share


Excel Options


Options
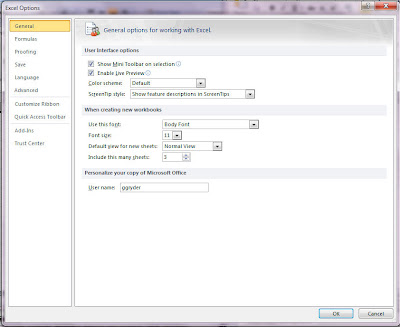
The default program options can be found in Office Button>Options. The Options are divided into:

General

General options for working with Excel.

  • User Interface options
  • When creating new workbooks
  • Personalize your copy of Microsoft Office

Formulas

Change options related to formula calculation, performance, and error handling.

  • Calculating options
  • Working with formulas
  • Error Checking
  • Error checking rules

Proofing

Change how Excel corrects and formats your text.

  • AutoCorrect options
  • When correcting spelling in Microsoft Office programs

Save

Customise how workbooks are saved.

  • Save workbooks
  • AutoRecover exceptions for:
  • Offline editing options for document management server files
  • Preserve visual appearance of the workbook

Language

Set the Office Languages Preferences.

  • Choosing editing languages
  • Choose display and Help languages

Advanced

Advanced options for working with Excel.

  • Editing options
  • Cut, copy and paste
  • Image Size and Quality
  • Print
  • Display
  • Display options for this workbook
  • Display options for this worksheet
  • Formulas
  • When calculating this workbook
  • General
  • Lotus compatibility
  • Lotus compatibility Settings for:

Customise Ribbon

Customise the Ribbon.

  • Choose the commands from:
  • Customise the Ribbon:
  • New Tab
  • New Group
  • Rename
  • Restore Defaults
  • Import/Export

Quick Access Toolbar

Customise the Quick Access Toolbar.

  • Choose commands from:
  • Customise Quick Access Toolbar:
  • Restore Defaults
  • Import/Export

Add-Ins

View and manage Microsoft Office add-ins.

  • Add-ins

Trust Center

Help keep your documents safe and your computer secure and healthy.

  • Protecting your privacy
  • Security & more
  • Microsoft Office Excel Trust Center
  • Trust Center Settings...

The Ribbon

The Ribbon, introduced by Microsoft in Office 2007 as ‘the way to go’, is used throughout most of Microsoft’s software and has even been introduced into programs like MS Paint and Word Pad. In Excel it consists of eight tabs each of which is divided into groups, now you can add your own customised tabs (to be covered later...).

Excel main window


The main Tabs on the Ribbon are:

  • Home
  • Insert
  • Page Layout
  • Formulas
  • Data
  • Review
  • View
  • Add-Ins

The Home Tab is the first and main tab. The Groups within a tab are what use to be the contents of a dropdown menu, or at least some of it. If the group has more options than those showing there will be a tiny Dialogue Box Launcher in the bottom right corner of the Group section. The Groups on the Home Tabs are:

Home Groups

  • Clipboard
  • Font
  • Alignment
  • Number
  • Styles
  • Cells
  • Editing

The Home Tab and the contents of its Groups are identical to those in Office 2007

The Groups on the Insert Tab are:

Insert Groups

  • Tables
  • Illustrations
  • Charts
  • Sparklines (New)
  • Filter
  • Links
  • Text
  • Symbols (New)

The Illustrations Group in Excel 14 has the new addition of the Screenshot and Screen Clipping options.

Another new addition to the Insert Tab is Sparkline. A Sparkline is a type of information graphic characterized by its small size and data density. Sparklines present trends and variations associated with some measurement, such as average temperature or stock market activity, in a simple and condensed way (in this case one cell).

The Sparkline Group is options are:

  • Line – Insert Line Sparkline

Line sparklines are used to display a line chart within a single cell.

  • Column – Insert Column Sparkline

Column sparklines are used to display a column in a single cell.

  • Win/Loss – Insert Win/Loss Sparkline

Win/Loss sparklines are used to display a win/loss chart in a single cell.

Filter is another new Group on the Insert Tab

  • Filter – Insert Slicer

Use buttons to easily filter PivotTables or cube functions.

Symbol was part of the Text Group in Excel 12, now it has its own Group

Symbols

  • Equation – Insert Equation

Insert common mathematical equations or build up your own equations using library or math symbols

  • Symbol
Insert characters that are not on your keyboard, such as copyright symbols, trademark symbols, paragraph marks and Unicode characters.

Insert Tab


Next, Excel (overview) Continued...


Saturday 27 June 2009

Office 2010 – Word V

Word 2010 - Part 5 Background Removal

Photoshop comes to Word

A new feature in Word 14 is Background Removal. To access it and its functions open the Insert Tab and either insert an image Insert>Picture or Insert>Screenshot and follow one of the options covered in Part 4.

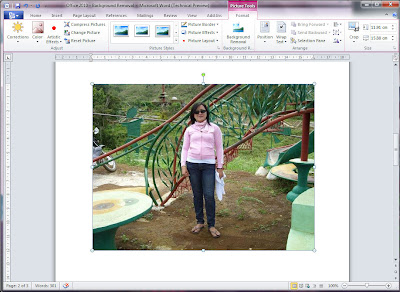
This time I will use an image from file. When the image opens it will automatically load the Picture Tools Format Tab, select Background Removal.


The Background Removal tool will follow the main lines in the image and try to determine which the likely areas to remove or keep are. In this case it came close but not close enough.

The three options in Background Removal are:

  • Mark to Include
  • Mark to Remove
  • Delete Marks

Selecting 'Mark to Include' I've clicked and dragged four diagonal lines, one on each corner, to show I want to keep some of those areas. Then I tell it the areas to exclude with 'Marks to Remove'. You have to play around with it, adding some areas and removing others, until you're happy with the result.


Hit Return when you're happy with the result


Add a Picture Style>Compound Frame Black and a Picture Effect, Picture Effects>Reflection>Half Reflection 8 pt offset


Or, Picture Effects>Glow>Purple 18 pt glow, Accent colour 4


Thanks to Gleannie for letting me use her photo

Part 6 - Microsoft Office Exel 2010 (14).....


Friday 26 June 2009

Office 2010 – Word IV

Blog from Word

I am just testing the automatic Blog post document option in Word 14. It took less than 20 seconds to set up.

Now let's see if it posts?

Apparently all I have to do is click Publish

Publish – Publish the post to the blog account so that other people can read it.

Well, I guess it tried. Acually it was uploaded to the Blogger site but was waiting as a draft.

The images were added later.


Next, Word continued...


Office 2010 – Word III

Word 2010 - Part 4 Insert/Screenshot

A really nice new feature of Word 14 is the Screenshot (screen capture) it is like having a Photoshop/photo editing program hidden inside Word. Screenshot is also included in PowerPoint 2010.

On the Insert Tab ‘click’ its icon to see a thumbnail preview of all windows showing on the desktop. Either select one or click Screen Clipping. Screen Clipping takes you to the desktop covered with a grey mask. Drag/Click the desired area, releasing the mouse automatically inserts the selection in the document.


Choosing one of the Available Screen Shots thumbnails from the dropdown is the real strength of the tool. It does everything for you. Click on the thumbnail and it inserts into the document opening the Picture Tools - Format Ribbon which is divided into:

  • Adjust
  • Picture Styles
  • Background Removal
  • Arrange
  • Size


Having inserted the image (in this case a yahoo messenger window) hovering the mouse over the various Picture Style effects shows a real-time preview in the document. In this case I’ve selected the Relaxed Perspective, white. I will cover Background Removal (a new and very cool feature) and Text Wrapping on another image (to follow...).


On the right of the Picture Styles section:

  • Picture Boarder – Specify the colour, width, and the line style for the outline of the selected shape.
  • Picture Effects – Apply a visual effect to the picture, such as a shadow, glow, reflection or 3d rotation.
  • Picture Layout – Convert to SmartArt Graphic.


Each option had its own dropdown menu with thumbnails and full preview in the document. In this case I’ve chosen Picture Effects>Glow>Orange, 18 pt glow, Accent colour 6. The effect can be customised, in this case Picture Effects>Glow>Glow Options:

  • Presets
  • Colour
  • Size
  • Transparency


The Adjust section of the ribbon consists of:

  • Corrections – Improve the Brightness, Contrast or Sharpness of the picture.
  • Color – Change the colour of the picture to improve quality or match document content.
  • Artistic Effects – Add artistic effects to the picture to make it look more like a sketch or painting.
  • Compress Picture – Compress pictures in the document to reduce its size.
  • Change Picture – Change to a different picture, preserving the formatting and size of the current picture.
  • Reset Picture - Discard all of the formatting changes you made to this picture.


Next, Word continued...


Microsoft Office 2010 - Word II

Word 2010 - Part 3 Save/Save As

Word 2010 also known as Word 14 (Microsoft decided to skip version 13 for ‘superstitious’ reasons jumping from 12 to 14) uses the default DOCX (Office Open XML) format. As with other versions of Word the default save can be set Options/Save/Save files in this format. Here is the full list of formats:

  • Word Document (*.docx)
  • Word Macro-Enabled Document (*.docm)
  • Word 97-2003 Document (*.doc)
  • Word Template (*.dotx)
  • Word Macro-Enabled Template (*.dotm)
  • Word 97-2003 Template (*.dot)
  • PDF (*.pdf)
  • XPS Document
  • Single File Web Page (*.mht, .mhtml)
  • Web Page (*.htm, .html) Web Page Filtered (*.htm, .html)
  • Rich Text Format (*.rtf)
  • Plain Text (*.txt)
  • Word XML Document (*.xml)
  • Word 2003 XML Document (*.xml)
  • OpenDocument Text (*.odt)
  • Works 6 - 9 Document (*.wps)
  • Works 6.0 - 9.0 (*.wps)

XML Paper Specification

Learn more here and download the viewer

The XML Paper Specification describes XPS documents and how they are organized internally and rendered externally. The XML Paper Specification builds on the Open Packaging Conventions. The XML Paper Specification is intended for producers who want to create document files in the XPS document format, and consumers who want to access, render, or process the contents of an XPS document.

An XPS document is a paginated set of related pages. The pages have a fixed layout, are organized into one or more fixed documents, and stored according to the Open Packaging Conventions. XPS documents support digital signatures and information rights management of the contents. XPS documents also support optional components that can group page contents together for easier streaming and provide information and control data that can be used when the document is printed.

Software that complies with version 1.0 of the XML Paper Specification will create documents that are compatible with Windows Vista. Version 1.0 of the XML Paper Specification is compatible with the latest working draft of the Open Packaging Conventions and the Open XML Markup Compatibility specification.

Next, Word continued...