Saturday 29 August 2009

Office 2010 - Suites


Microsoft Office 2010 - Packaging

Office Professional Plus (Volume licensing only)

  • Microsoft Access 2010
  • Microsoft Communicator
  • Microsoft Excel 2010
  • Microsoft InfoPath 2010
  • Microsoft Office Web applications
  • Microsoft OneNote2010 (New to Office)
  • Microsoft Outlook 2010 (Includes Business Contact Manager)
  • Microsoft PowerPoint 2010
  • Microsoft Publisher 2010
  • Microsoft SharePoint Workspace 2010 (New to Office)
  • Microsoft Word 2010

Office Professional 2010

  • Microsoft Access 2010
  • Microsoft Excel 2010
  • Microsoft OneNote 2010 (New to Office)
  • Microsoft Outlook 2010
  • Microsoft PowerPoint 2010
  • Microsoft Publisher 2010
  • Microsoft Word 2010

Office Home & Business 2010 (New)

  • Microsoft Excel 2010
  • Microsoft OneNote 2010
  • Microsoft Outlook 2010
  • Microsoft PowerPoint 2010
  • Microsoft Word 2010

Office Standard 2010 (Volume licensing only)

  • Microsoft Excel 2010
  • Microsoft Office Web applications
  • Microsoft OneNote 2010 (New to Office)
  • Microsoft Outlook 2010
  • Microsoft PowerPoint 2010
  • Microsoft Publisher 2010 (New to Office)
  • Microsoft Word 2010

Office Home & Student 2010 (Non-commercial license)

  • Microsoft Excel 2010
  • Microsoft OneNote 2010
  • Microsoft PowerPoint 2010
  • Microsoft Word 2010

Thursday 27 August 2009

Microsoft Office


A brief chronology of Microsoft Office applications

1983

After the release of Multi-Tool Word the first version of Microsoft Word 1.0 for MS-DOS was released.

1985

Microsoft Word 1.0 and Microsoft Excel for the Mac and also Word 2.0 for MS-DOS are released.

1986

Microsoft Word 3.0 for the Mac and Word 3.0 for MS-DOS are released.

1987

Microsoft buys Forethought, the original company behind PowerPoint.

1988

Microsoft launches PowerPoint 2.0 for the Mac.

1989

Office 1.0 for the Mac is launched It includes Word 4.0, Excel 2.2 and PowerPoint 2.01.

1990

PowerPoint 2.0 for Windows is announced. Office 1.0 for Windows is available and includes Excel 2.0, Word 2.1 and PowerPoint 2.0.

1991

Microsoft announced the availability of Microsoft Excel for Windows 3.0.

1992

Office 3.0 for Windows is available and includes Microsoft PowerPoint 3.0 in combination with Microsoft Word for Windows 2.0 and Microsoft Excel 4.0.

1993

Office 4.0 for Windows ships with updated versions of Excel and Word.

1994

Office 4.3 Professional for Windows is available, featuring Access 2.0.

1995

Office 95 is the first complete package of 32-bit applications available for Windows 95.

1996

Exchange Server 4.0 is released. This is the original version of Exchange Server and was introduced as an upgrade from Microsoft Mail.

1997

Microsoft Outlook 97 and Exchange Server 5.0 are available.

1998

Office 98 the Mac Edition includes Word 98, Excel 98, PowerPoint 98 and Outlook Express.

1999

Access 2000 and Microsoft Office 2000 are launched.

2000

Exchange 2000 Server is released.

2001

Microsoft Office SharePoint Portal Server 2001 and Microsoft Office XP are released.

2003

Microsoft launches Office 2003, with Microsoft Office SharePoint Portal Server 2003. Microsoft Office OneNote and InfoPath have been added the Office line-up. Exchange Server 2003 is released.

2005

Microsoft buys Groove.

2006

Exchange Server 2007 is released.

2007

Microsoft Office 2007 is released, including Office SharePoint Server 2007.

2008

Microsoft announced the worldwide availability of Office Live Workspace beta.

2009

Live@edu services become known as Outlook Live while Exchange 2010 and Office 2010 are launched respectively as Beta and Technical Preview.


Tuesday 25 August 2009

PowerPoint - Adding video

Add video

Details in a later post.


Monday 24 August 2009

Windows 7 - The Movie

The best way to take a look at Windows 7 is to actually see it. Although my video making skills could best be described as ‘crap’, adding a bit of music to it does show a slight improvement on earlier attempts.


Sunday 23 August 2009

Windows 7 - Versions

From Home Basic to Ultimate


Windows 7 will be available in six versions, in reality for most users it will be a choice of two and those with any sense just one. My reasoning being that Home Premium is the version that offers the best deal and the pricier Ultimate offers so few extras that buying Home Premium and, if you wish, manually add the missing extras; namely BitLocker Drive Encryption.

The six Windows 7 versions are:

  • Windows 7 Home Basic
  • Windows 7 Starter
  • Windows 7 Home Premium
  • Windows 7 Professional
  • Windows 7 Enterprise
  • Windows 7 Ultimate

Windows Home Basic

Home Basic is not intended for Microsoft’s main markets therefore it will only be available in countries that come under the underdeveloped category.

Windows 7 Starter

At the bottom end of the Windows 7 spectrum that will be available is Windows 7 Starter, which, to my knowledge will be pre-installed on Netbooks and appear on some low-end computers.

What you get is the basic Windows 7 interface minus the good bits. The ‘good bits’ being the Aero and preview effects which will be covered in detail later. It does include such features as the Action Center, Windows Search, Windows Firewall, Windows Media Player (not Windows Media Center), Windows Gadgets and the usual games and accessories (Paint, WordPad Etc.). Unless you buy a Netbook with Windows 7 pre-installed you can place it safely on the ‘don’t touch with a barge-pole’ list. The unnecessary restrictions on things like changing the desktop image and the absence of the visual effects make it unattractive.

Windows 7 Home Premium

Have a good look at Windows Home Premium because for the next few years this is what you are going to be using. I will cover the features included with Windows 7 Home Premium and other versions in the next post.

Windows 7 Professional

If you need to handle up to 192 gigabytes of ram (in 64 bit version) as opposed to 16 gigabytes and you also need a virtual PC that runs Window XP (licensed version of Windows XP service pack 3 included) for the remaining compatibility issues that will linger, then Windows 7 Professional is for you. Network backup and EFS (Encrypting File System) support are also included.

Windows 7 Enterprise

Like Windows 7 Home Basic there is not much to be said about a product that will not be available. Windows 7 Enterprise contains all the features of Windows 7 Ultimate but is aimed at Microsoft’s corporate customers and is not available for purchase by individuals.

Windows 7 Ultimate

Top of the range is Windows 7 Ultimate which will contain all Windows 7 components, including BitLocker Drive Encryption is the choice for someone who has to have everything. Unfortunately for those who have to have everything is that the ‘everything’ not included in Windows 7 Home Premium can be downloaded from third party software makers.

Try them all

When you buy a Windows 7 disc (any version) and try to install it, it will install the version you bought, obvious really. But if you like playing around with things like that then you will discover that all versions are contained on the disc. To access the other versions and try the 30 day trials for them you need to rip the disc and delete the ei.cfg file. After creating an ISO image (minus the deleted file) and burning it to a new disc the next time you insert the disc there will be a ‘Select the operating system you want to install’ screen showing all versions except Windows 7 Enterprise.


Windows 7

Windows 7 - 30 day trial (or more?)


October 22 is the release date for Windows 7 and, although I have used the Release Candidate (Evaluation Copy) Build 7100 for some months now, it was my intention to start the 30 day trial period of the RTM version in the run-up to the release date.

Sometime last week a story appeared on the web about a bug in Windows 7 which allows you to extend the 30 day trial period, or as Microsoft call it 'Rearm' it, for another 30 days. The process can be repeated three times in all giving four months (approximately) or 120 days of free use before deciding to buy.

At the moment there are no actual discs available for Windows 7, only downloads, but when they do become available, regardless of which version you buy, you will have access to all versions including a 30 day trial period to try it.

To get the extension to the trial period is simple and is already in built into the system. I would not advise experimenting with it until it is close to expiring because it will reset the clock on the trial regardless of how many days left you have.

The easiest way to check how long is left on the trial is to right-click on Computer from the Start menu and select Properties. At the bottom of the page is Windows activation showing the number of days left before activation is needed.


The Bug

The thing I like about 'The Bug' is that it was built into the system by Microsoft so it is not some hack or crack found on a forum that could screw up your system and/or complicate your license agreement.

Before reaching the end of your trial period (Windows 7 any version) go to the Start menu and in Accessories right-click on the Command Prompt selecting 'Run as administrator'. In the Command Prompt type 'slmgr -rearm' (without quotes) and hit Return. Restart windows and check the properties page which will now show 30 days before activation is required.


Windows Software Licensing Management Tool

Usage: slmgr.vbs [MachineName [User Password]]

MachineName: Name of remote machine (default is local machine)

User: Account with required privilege on remote machine

Password: password for previous account

Global Options:

/ipk

Install product key (replaces existing key)

/ato [Activation ID]

Activate Windows

/dli [Activation ID | All]

Display license information (default: current license)

/dlv [Activation ID | All]

Display detailed license information (default: current license)

/xpr [Activation ID]

Expiration date for current license state

Avanced Options

/cpky

Clear product key from the registry (prevents diclosure attacks)

/ilc

Install license

/rilc

Re-install system license files

/rearm

Reset the licensing status of the machine

/upk [Activation ID]

Uninstall product key

/dti [Activation ID]

Display Intallation ID for offline activation

/atp [Activation ID]

Activate product with user-provided Confirmation ID

Volume Licensing: Key Management Service (KMS) Client Options

/skms [Activation ID] [Activation ID]

Set the name and/or the port for the KMS computer this machine will use. IPv6 address must be specified in the format [hostname]:port

/ckms [Activation ID]

Clear name of KMS computer used (sets the port to the default)

/skhc

Enable KMS host caching

/ckhc

Disable KMS host caching

Volume Licensing: Token-based Activation Options:

/lil

List installed Token-based Activation Issuance Licenses

/ril

Remove installed Token-based Activation Issuance License

/ctao

Clear Token-based Activation Only flag (default)

/stao

Set Token-based Activation Only flag

/ltc

List Token-based Activation Certificates

/fta []

Force Token-based Activation

Volume Licensing: Key Management Service (KMS) Options

/sprt

Set TCP port KMS will use to communicate with clients

/sai

Set interval (minutes) for unactivated clients to attempt KMS connection. The activation interval must be between 15 minutes (min) and 30 days (max) although the default (2 hours) is recommended.

/sri

Set renewal interval (minutes) for activated clients to attempt KMS connection. The renewal interval must be between 15 minutes (min) and 30 days (max) although the default (7 days) is recommended.

/sdns

Enable DNS publishing by KMS (default)

/cdns

Disable DNS publishing by KMS

/spri

Set KMS priority to normal (default)

/cpri

Set KMS priority to low


Tuesday 18 August 2009

Access 2010 - Forms


Create Forms in Access 2010

Access 2010 is different from other Office 2010 applications in that the basic functions of programs like Word and Excel are fairly obvious and work well ‘out of the box’. Access on the other hand needs a bit more preparation. There are, of course, Wizards to help you through the creation of simple Forms, Queries and Reports though some kind of in-depth knowledge is needed to advance the programs functions any further and get the most out of the application.

Creating Forms

It is possible to create a decent looking form in just a few easy steps from the Tab Create > Forms.

  • Form

Create a form that lets you enter information for one record at a time.

  • Form Design

Create a new blank form in Design View. In Design View, you can make advanced design changes to forms, such as adding custom control types and writing code.

  • Blank Form

Create a form with no controls or format.

  • Form Wizard

Automatically create a form choosing fields from Tables or Queries

  • Multiple Items

Create a web form that shows multiple records at once.

  • Datasheet

Enters the Form Tools > Datasheet Tab to create a form directly from the Datasheet.

  • Split Form
Create a split form that shows a datasheet in the upper section and a form in the lower section for entering information about the record selected in the datasheet.
  • Modal Dialog

Create a Modal Dialog from Form Design Tools

  • PivotChart

Create a PivotChart from the PivotChart Tools > Design Tab

  • PivotTable

Create a PivotTable view. PivotTable views are interactive, making it easy for you to lay out the data in the format that works best for you, view summary data, or to see more detailed data.


Tuesday 11 August 2009

Word 2010 - Navigation Pane


Word 2010 - Navigation Pane

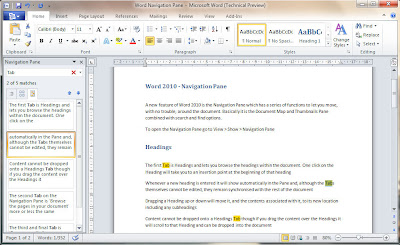
A new feature of Word 2010 is the Navigation Pane which has a series of functions to let you move, with no trouble, around the document. Basically it is the Document Map and Thumbnails Pane combined with search and find options. To open the Navigation Pane go to View > Show > Navigation Pane.

Headings

The first Tab is Headings and lets you browse the headings within the document. One click on the Heading will take you to an insertion point at the beginning of that heading. Whenever a new heading is entered it will show automatically in the Pane and, although the Tabs themselves cannot be edited, they remain synchronised with the rest of the document.

Dragging a Heading up or down will move it, and the contents associated with it, to its new location including any subheadings. Content cannot be dropped onto a Headings Tab though if you drag the content over the Headings it will scroll to that Heading and can be dropped into the document.

When a document has multiple authors a small icon will appear on the right of the Heading to indicate that the document is being edited by a different user. After saving changes in a multi-user document the Headings where the changes have been made will be highlighted the next time the document is reopened. Using the Search Document feature at the top of the Navigation Pane will highlight any of the Headings where the search term has been found.

Browse

The second Tab on the Navigation Pane is ‘Browse the pages in your document’ more or less the same has the Thumbnails Pane of old. The only real difference from the Thumbnails Pane is that it now shows all layout views, Web Layout, Outline, Draft, Etc. Also new to the Thumbnail/Browse is really useful feature whereby the pages are filtered to show only pages containing the terms from a search.

Search

The third and final Tab is ‘Browse results from your current search’ which shows a list of boxes each giving a bit of context to the term.


Monday 27 July 2009

Office 2010 - Visio & Project

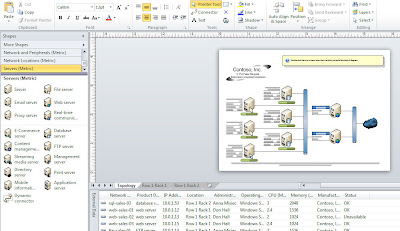
Microsoft Office Visio 2010


Microsoft’s diagram creating application Microsoft Office Visio 2010, although not available with Office 2010 Professional it will be included in some versions of Office 2010. Has expected the latest version of Visio been given a Ribbon. Visio is particularly useful when connected to Excel or Access files. It can be used to show representations of the data in an effective way that turns simple facts and figures into a more dynamic visual representation.

Data from most Microsoft Office 2010 applications can be imported into Visio through the Data Selection Wizard and associated with single, groups or all shapes within the diagram.

Visio diagrams should not be confused with PowerPoint or Word static diagrams, they are a means of tracking data in a visual form from any number of sources including Excel spreadsheets, SharePoint sites, Project schedules, Etc.

The Visio Ribbon Tabs and Groups are:

Home:

  • Clipboard
  • Font
  • Paragraph
  • Tools
  • Shape
  • Arrange
  • Editing

Insert:

  • Pages
  • Illustrations
  • Diagram Parts
  • Links
  • Text

Design:

  • Page Setup
  • Themes
  • Background
  • Layout

Data:

  • External Data
  • Display Data
  • Show/Hide

Process:

  • Subprocess
  • Diagram Validation
  • SharePoint Workflow

Preview:

  • Proofing
  • Language
  • Comments
  • Markup
  • Reports

View:

  • Views
  • Show
  • Zoom
  • Visual Aids
  • Window
  • Macros

Office (Visio) Button

Options

General:

General options for working with Visio.

  • User Interface options
  • Personalise your copy of Microsoft Office

Proofing:

Change how Visio corrects and formats your text.

  • AutoCorrect options
  • When correcting spelling in Microsoft Office programs
  • When correcting spelling in Visio

Save:

Customise how documents are saved.

  • Save documents
  • Offline editing options for document management server files

Language:

Set Office Language Preferences.

  • Choose Editing Languages
  • Choose Display and Help Languages

Advanced:

Advanced options for working with Visio.

  • Editing options
  • Display
  • Save/Open
  • Shape search
  • General

Customise Ribbon:

Customise the Ribbon.

  • Choose commands from:
  • Customise the Ribbon:
  • New Tab
  • New Group
  • Rename
  • Restore Defaults
  • Import/Export

Quick Access Toolbar:

Customise the Quick Access Toolbar.

  • Choose commands from:
  • Customise Quick Access Toolbar:
  • Restore Defaults
  • Import/Export

Add-Ins:

View and manage Microsoft Office add-ins.

  • Add-ins

Trust Center:

Help keep your documents safe and your computer secure and healthy.

  • Protecting your privacy
  • Security & more
  • Microsoft Office Visio Trust Center
  • Trust Center Settings

Microsoft Office Project 2010


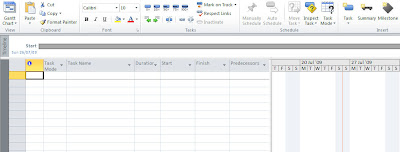
Office Project 2010 is project management application (MSP) which, until Office 2010, has not appeared as part of any Office suite. It is designed primarily to assist project managers in analysing, budgeting and tracking the progress of a project through the use of network diagrams and Gantt charts. A Gantt chart is timeline illustration chart that shows the projects elements, dependencies, relationships, Etc.

The Project Ribbon Tabs and Groups are:

Task:

  • View
  • Clipboard
  • Font
  • Tasks
  • Schedule
  • Insert
  • Properties
  • Editing

Resource:

  • View
  • Assignments
  • Insert
  • Properties
  • Level

Project:

  • Insert
  • Properties
  • Schedule
  • Status
  • Reports
  • Proofing

View:

  • Task Views
  • Resource Views
  • Data
  • Zoom
  • Split View
  • Window
  • Macros
  • Gantt Chart Tools

Format:

  • Format
  • Columns
  • Bar Styles
  • Gantt Chart Style
  • Show/Hide
  • Drawings

Office (Project) Button

Options

General:

General options for working with Project.

  • User Interface options
  • Project view
  • Personalise your copy of Microsoft Office

Display:

Change how Project content is displayed on the screen.

  • Calendar
  • Show indications and options for this project:
  • Show indications and options buttons for:
  • Show these elements

Schedule:

Change options related to scheduling calendars, and calculations.

  • Calendar options for this project:
  • Schedule
  • Scheduling options for this project:
  • Schedule Alerts Options:
  • Calculation
  • Calculation options for this project:

Proofing:

Change how Project corrects and formats your text.

  • AutoCorrect options
  • When correcting spelling in Microsoft Office programs
  • When correcting spelling in Project

Save:

Customise how projects are saved.

  • Save projects
  • Save templates
  • Cache
  • Language:
  • Set the Office Language Preferences.
  • Choose Editing Languages
  • Choose Display and Help Languages

Advanced:

Advanced options for working with Project.

  • General
  • Project Web Access
  • Planning Wizard
  • General options for this project
  • Edit
  • Display
  • Display options for this project:
  • Cross project linking options for this project:
  • Calculation options for this project

Customise Ribbon:

Customise the Ribbon.

  • Choose commands from:
  • Customise the Ribbon:
  • New Tab
  • New Group
  • Rename
  • Restore Defaults
  • Import/Export

Quick Access Toolbar:

Customise the Quick Access Toolbar.

  • Choose commands from:
  • Customise Quick Access Toolbar:
  • Restore Defaults
  • Import/Export

Add-Ins:

View and manage Microsoft Office add-ins.

  • Add-ins

Trust Center:

Help keep your documents safe and your computer secure and healthy.

  • Protecting your privacy
  • Security & more
  • Microsoft Office Project Trust Center
  • Trust Center Settings

Sunday 26 July 2009

Office 2010 - News

Office 2010 - Sample Templates


I was beginning to think that we would have to wait for the full release of Office 2010 to see the support programs up and running. Over the last couple of days I’ve noticed the Office Online has been functional, albeit in a limited manner, though better than nothing.

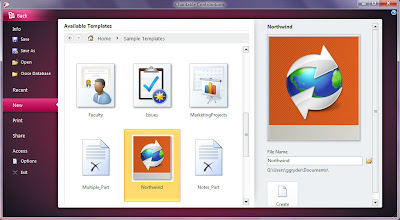
Also the Sample Templates are now active and, although it is still not possible to search for additional templates, there seems to be quite and extensive list for each application.

Access 2010 (Available Templates)

  • Assets
  • Bugs
  • CharitableContributions
  • Contacts
  • Details_Part
  • Events
  • Faculty
  • Issues
  • MarketingProjects
  • Multiple_Part
  • Northwind
  • Notes_Part
  • Projects
  • SalesPipeline
  • Students
  • Tasks
  • Tasks_Part

Excel 2010 (Available Templates)


  • Billing Statement
  • Blood Pressure Tracker
  • Expense Report
  • Loan Amortization
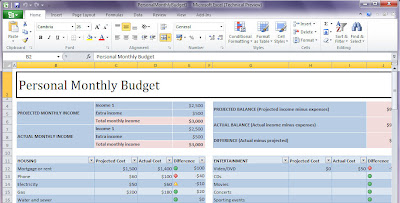
  • Personal Monthly Budget
  • Sales Report
  • Time Card

InfoPath 2010 (Available Form Templates)

Popular Form Templates

  • SharePoint List
  • SharePoint Document Library
  • Blank
  • E-mail
  • Blank (InfoPath Editor)

Advanced Form Templates

  • Database
  • Web Service
  • XML or Schema
  • Data Connection File
  • Convert Word or Excel Form
  • Document Information Panel

InfoPath 2007 Form Templates

  • Blank
  • Blank (InfoPath Editor)

Template Parts

  • Blank
  • XML or Schema

PowerPoint 2010 (Available Templates and Themes)

  • Apex
  • Aspect
  • Civic
  • Concourse
  • Equity
  • Flow
  • Foundry
  • Median
  • Metro
  • Module
  • Opulent
  • Oriel
  • Origin
  • Paper
  • Solstice
  • Tecknic
  • Trek
  • Urban
  • Verve

Word 2010 (Available Templates)

Sample Templates

  • Equity Fax, Letter, Merge Fax, Merge Letter, Report, Resume
  • Median Fax, Letter, Merge Fax, Merge Letter, Report, Resume
  • New Blog Post
  • Office Word 2003 Look
  • Oriel Fax, Letter, Merge Fax, Merge Letter, Report, Resume
  • Origin Fax, Letter, Merge Fax, Merge Letter, Report, Resume
  • Urban Fax, Letter, Merge Fax, Merge Letter, Report, Resume

Office Online Templates (Not yet Available)

  • Budgets
  • Business Cards
  • Calendars
  • Faxes
  • Forms
  • Gift Certificates
  • Invoices
  • Minutes
  • More Categories (Analysis worksheets, Office document themes, SmartArt Graphics)
  • Planners
  • Plans

Saturday 25 July 2009

Access 2010 - Database III

Access 2010 Objects


Queries

Using a Query in Access 2010 allows you to extract database information from Records that meet a certain criteria. Let’s say your database is concerned with holidays in European resorts and the customers who booked them. A query can be asked to filter customers of a given age group, those choosing a particular destination or any combination of factors. Most Reports and Forms are based on the results of Queries.

In Access 2010 Queries can be found on the Create Tab under the Group Other:

Query Wizard

Show the Query Wizard, which helps you create a Simple Query, Crosstab Query, Find Duplicates Query or a Find Unmatched Query

Query Design

New Object Query

Create a new, blank Query in Design view

The Show Table dialogue box is displayed, from which you can choose tables or Queries to add to the Query design.

Reports & Labels

A Report in Access 2010 is a way of exporting, sharing and printing data, it can be all the data or that part which meets the conditions set by a Query. The names and addresses of customers that meet a certain criteria (or several) can be extracted in Report form. Financial Reports based on sales is another example.

Create > Reports:

Report

Create a basic Report to the data in the current Query or Table, to which you can add features such as groups or totals.

New Object: Report

Create a new blank Report in Design view

In Design view, you can make advanced design changes to Reports, such as adding custom control types and writing code.

Blank Report

Create a new blank Report so that you can insert fields and controls and design the Report.

Report Wizard

Show the Report Wizard which helps you to create simple, customised reports.

Labels

Show the Label Wizard to create standard or custom labels.

Forms

Forms in Access 2010 allow users to add data to a table and display data in a more coherent view than the datasheet format. The accuracy of the data can be checked before being added to the Fields. A Form can also be used to display, print and share selective Fields from a Table while restricting access to other Fields.

Create > Forms

Forms

Create a Form that lets you enter information for one record at a time.

New Object: Form

Create a new blank Form in Design view.

In Design view, you can make advanced design changes to Forms, such as adding custom control types and writing code.

Blank Form

Create a Form with no controls or format.

Form Wizard

Will let you choose which Fields you want on your Form, you can choose from more than one Table or Query.

Navigation

Allow users of your application to get to the Forms and Reports they need.

More Forms

  • Multiple Items
  • Datasheet
  • Split Form
  • Modal Dialogue
  • PivotChart
  • PivotTable

Other Access 2010 Objects are: Create > Other

Module

Class Module

Visual Basic

Create > Templates

Application Parts

Insert or create portions of a database or an entire database application.

Create Tables, Forms and Reports as database parts. Save combinations and use them to form common components. You can also save an entire application.

Create > Tables

Table

Create a new blank Table. You can define the Fields directly in the new Table, or open the Table in Design view.

Table Design

New Object: Table

Create a new blank Table in Design view. You can add Fields, set indexing options and perform other advanced Table design tasks.

SharePoint Lists

  • Contacts
  • Tasks
  • Issues
  • Events
  • Custom Existing SharePoint List
Friday 24 July 2009

Access 2010 - Database II

Creating a new table

Regardless of what experience you have using Access 2010 or earlier versions there are certain concepts to a database that you need to understand though it must be said that the levels to which you can take that understanding are endless.

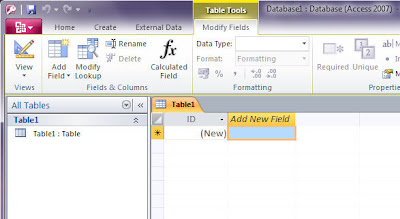
When we open Access 2010 the program starts on the Office Button New tab with ‘Blank Database’ selected. Click ‘Create’. Access creates a new database (Table1 : Table) listed in the Navigation Pane on the left. In the main window is the Datasheet.


The Datasheet is not a database object though it is one of the numerous ways of viewing the data contained within the database, for now it is empty and ready for data to be added.

Fields, Records & Values

The data, when added, is displayed in rows and columns much as you would see data in an Excel spreadsheet. The column headings are called ‘Fields’ and the contents of the rows ‘Records’. A row in a database is a single Record consisting of different Fields.

A Field has many properties that can define the specific types of data contained within it, or which can and can’t be added to it. If for example you have a Field called ‘Year’ and its properties have been set to only accept numeric data then it will not accept words, letters or symbols.

The Value is the actual data where the Record meets Field. For example under the Field ‘Year’ on the first Record the Value could be ‘2009’ and, although there will be many instances of 2009, this Value is specific to this Record.

Naming Names

Whilst a database is small in size the names of objects might not seem to have much importance but once it starts to grow it will have. It is important to determine a convention for naming objects in a database even the tables themselves. If you create Reports, Forms, Queries, Etc. Based on a table, changing the name of the table will break the link between the table and the objects that use its information.

Tables and Queries share the same namespace within a database accordingly they need to have different names. Tables, Forms, Macros and Reports may share the same name. My own preference is to precede the name of an object with a shortened description, underscore and its name:

  • tbl_Name
  • qry_Name
  • rpt_Name
  • frm_Name
  • mcr_Name
  • mod_Name

It is always a good idea to give both Fields and Objects clear and descriptive names when you create them, regardless of the fact that most work done using Access 2010 or any other version is usually done on an existing database. The point being that, although AutoCorrect will accept changes, it will not update the name changes in the properties nor in any VBA code or Macros.

Thursday 23 July 2009

Access 2010 - Database

Microsoft Office Access 2010

Access 1.0, based on the Jet Database Engine was released at the end of 1992 and was intended to be Jet-compatible through its scripting language Access Basic. It became a full member of the Office line-up as Access 95 abandoning Access Basic for VBA (Visual Basic for Applications).

Although Access 2010 will probably be known as Access 14 (Office 13 having been skipped for superstitious reasons) it is actually the tenth full release of the program.

A database is a table based on a filing system that contains data in columns and rows (similar to Excel) and each table constitutes a single entity which enables the data to be manipulated in a logical manner. You can think of it as an automated version of an archive of files that can be retrieved and help turn even large amounts of date into useful information.

Access 14, 10 or 2010 is a relational database management system (RDBMS) and is the overall container for the data associated with it. Some of the more commonly used objects in Access are Tables, Forms, Reports, Queries and Macros. It is my intention to look at all five, if not more, in the following days, weeks.


Wednesday 22 July 2009

Outlook 2010 - Add-Ins

Add-Ins for Outlook 2010

Never having been a big fan of Add-ins, Add-ons, Extensions, Plugins, Etc. It is not surprising that I don’t have many to mention. I was going to look at the two that I do have but one of them (Snagit) added its add-in when I installed the program without asking if I wanted an Outlook 2010 Add-In during the installation.

Snagit 9 is a screen capture application with many useful tools and an excellent image editing program. Unfortunately, for Snagit, the Outlook Add-in is for taking a single screen capture and inserting it into a new Outlook message. The reason it is unfortunate is that Outlook 2010 has that capacity itself.

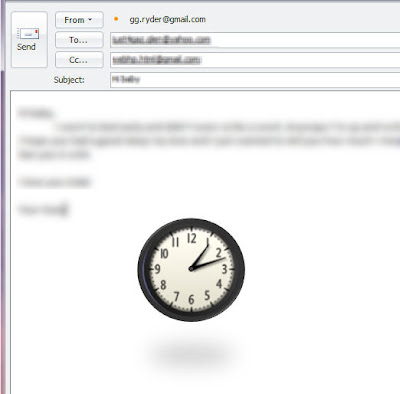
With the New E-mail window open Insert > Illustrations > Screenshot > Screen Clipping and drag a rectangle/square around the area to capture. If you want to capture a specific window a preview of available widows will appear in the Screenshot dropdown. The tool is most useful for adding webclips and images but in this case I’ve just added my desktop clock to a message!


Twitter on Outlook 2010

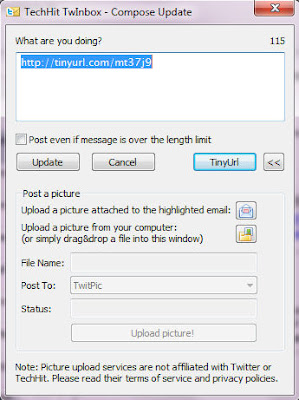
The second Add-In I have on Outlook 2010 is TwInBox. It is basically Twitter on Outlook 2010 and has a few useful features including; the mandatory 140 character update, direct message, @, ReTweet. If you intend using the Search/Track/Group feature it’s a good idea to create a separate folder for the results (for example searching/tracking Office 2010 gave 600+ feeds in two days).

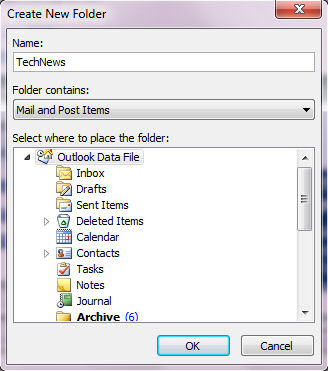
After installing you’ll need to create a new folder in the Navigation Pane, before logging into your Twitter account, into which will go your updates.

TinyUrl

If you wish to post links in your updates then the tinyurl creator is a useful tool to have on the Compose Update dialogue box. Although tinyurls are useful in a limited space (140 characters) I would make the point that they are being over used and unless I know and trust the person posting them I wouldn’t touch them. If you have an URL that isn’t that long to begin with then don’t shorten it. An example would be this site is http://officetwoten.blogspot.com and its shortened version is http://tinyurl.com/mt37j9 which would save a full seven characters!


Tuesday 21 July 2009

Outlook 2010 - Rules

Rules in Outlook 2010

Using Rules in Outlook 2010 is a great way to have messages do something specific before you actually read them. Rules also apply to sent messages but for the moment I will deal with received mail. There are many conditions you can apply to your incoming mail, for this example I will redirect some mail to a specific folder.

I get daily updates in my Gmail account from a few sites that I subscribe to. These sites could best be described as technology news sites like TechCrunch, Slashdot TechRepublic Etc. I don’t necessarily want to read them when I first open my inbox but for the moment that is where they appear.

Firstly I create a folder where I want the mail to be sent. After right-clicking on Outlook Data Files (in the left folder pane) and selecting New Folder I give the folder a name.


On the Home Tab, with one of the tech news emails selected click Rules, Create Rule from the Action Group.


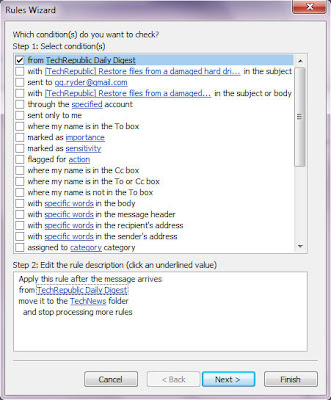
In the Create Rule dialogue box the name TechRepublic Daily Digest has been inserted in the list of ‘When I get e-mail with all of the selected conditions’, which I tick. Under ‘Do the following’ I tick ‘Move the item to folder: TechNews.


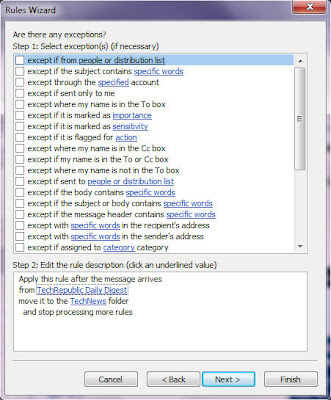
Clicking Advanced Options will open the Rules Wizard options and give lists of conditions that can be applied.


By selecting ‘Run this rule now on messages already in “Inbox”’, all older/read mail from TechRepublic will be move there.