Showing posts with label Screenshot. Show all posts

Wednesday, 1 July 2009

Office 2010 - Outlook II

Part 9 – Outlook (Overview)


Having closed the Setup Wizard (Part – 8) the main Outlook window will open and it will retrieve the contents of your email from your webmail account.


Outlook 2010, like its predecessors is both a complex and controversial piece of software. For the moment I will be sticking to a basic overview of the program structure, returning to advanced features and settings later. Has you can see from the screenshot Outlook 14 has the now familiar Ribbon and tabs. The main window is divided into sections, how many depends on preference and requirement. In this case three: Folders, conversations and the content of the selected item.


The selected (open conversation) email in this case has a link at the top of the page 'To view email has a webpage, go here'. One click will open the convesation in a browser window.


The Ribbon, Tabs and Groups on the Outlook 14 window are:

Home:

  • New
  • Delete
  • Respond
  • Quick Steps
  • Actions
  • Tags
  • Find


Send / Receive:

  • Send & Receive
  • Download
  • Headers
  • Preferences


Folder:

  • New
  • Actions
  • Clean Up
  • Favorites
  • Properties


View:

  • Current View
  • Arrangement
  • Layout
  • Window

Add-Ins:

  • Custom Toolbars

The Office (Outlook) Button:

Info


Open


print


Saving


Outlook Options


Are there options in Outlook 2010?

General:

General options for working with Outlook

  • User Interface options
  • Personalise your copy of Microsoft Outlook
  • Start Up options

Mail:

Change the settings for messages you create and receive.

  • Compose messages
  • Message arrival
  • Conversation Clean Up
  • Replies and forwards
  • Save messages
  • Send messages
  • MailTips
  • Tracking
  • Message format
  • Other

Calendar:

Change the settings for calendars, meetings and time zones.

  • Work time
  • Calendar options
  • Display options
  • Time zones
  • Scheduling assistant
  • Resource scheduling

Contacts:

Change how you work with your contacts.

  • Names and filing
  • Linking
  • Contacts index
  • Online status
  • Outlook created contacts

Tasks:

Change the settings that track your tasks and to-do items.

  • Task options
  • Work hours

Notes and Journal:

Change the settings for Notes and the Journal.

  • Notes options
  • Journal options

Search:

Change how items are searched with Instant Search.

  • Sources
  • Results

Mobile:

Change the settings for mobile notification and messaging.

  • Calendar Summary
  • Mobile Reminder
  • Mobile Notification
  • Mobile Options

Language:

Set the Office Language Preferences.

  • Choose editing languages
  • Choose display and Help languages

Advanced:

Options for working with Outlook

  • Outlook panes
  • Outlook start and exit
  • AutoArchive
  • Reminders
  • RSS Feeds
  • Send and receive
  • Developers
  • Dial-Up connections
  • International options
  • Offline editing options for document management server files
  • Other

Customise Ribbon:

Customise the Ribbon.

  • Choose commands from:
  • Customise the Ribbon:
  • New Tab
  • New Group
  • Rename
  • Restore Defaults
  • Import/Export

Quick Access Toolbar:

Customise the Quick Access Toolbar.

  • Choose commands from:
  • Quick Access Toolbar:
  • Restore Defaults
  • Import/Export

Add-Ins:

View and manage Microsoft Office add-ins.

  • Add-in Options
  • Add-ins

Trust Center:

Help keep your documents safe and your computer secure and healthy

  • Protecting your privacy
  • Security & more
  • Microsoft Outlook Trust Center


Next, Access 2010


Monday, 29 June 2009

Office 2010 – Excel II

Part 7 – Excel 14 (Overview continued)

I will go through the remaining Tabs listing their Groups but not all the functions of each group command. There is only one additional option; since Office 2007, apart from those mentioned in Part – 6, so I’ll just quickly run through the rest of the Tabs’ Groups.

Page Layout Groups:

  • Themes
  • Page Setup
  • Scale to fit
  • Sheet Options
  • Arrange

Formulas Groups:

  • Function Library
  • Defined Names
  • Formula Auditing
  • Calculation


In the Function Library>More Functions there’s an additional dropdown list ‘Compatibility’ which has 36 new functions (some are visible in the screenshot).


Data Groups:

  • Get External Data
  • Connections
  • Sort & Filter
  • Data Tools
  • Outline


Review Groups:

  • Proofing
  • Language (New)
  • Comments

Changes Language has simply been taken from the Proofing Group and given its own group.


View Groups:

  • Workbook Views
  • Show
  • Zoom
  • Window
  • Macros


Add-Ins Group:

  • Custom Toolbars


One thing I didn’t mention before it the tiny upward pointing arrow next to the ‘?’ help sign. Used for hiding the Ribbon, previously accessible from the Quick Access Toolbar dropdown menu.


Next Part - 8 Outlook


Saturday, 27 June 2009

Office 2010 – Word V

Word 2010 - Part 5 Background Removal

Photoshop comes to Word

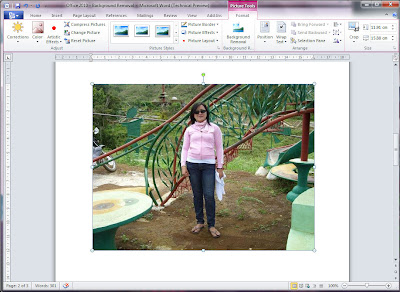
A new feature in Word 14 is Background Removal. To access it and its functions open the Insert Tab and either insert an image Insert>Picture or Insert>Screenshot and follow one of the options covered in Part 4.

This time I will use an image from file. When the image opens it will automatically load the Picture Tools Format Tab, select Background Removal.


The Background Removal tool will follow the main lines in the image and try to determine which the likely areas to remove or keep are. In this case it came close but not close enough.

The three options in Background Removal are:

  • Mark to Include
  • Mark to Remove
  • Delete Marks

Selecting 'Mark to Include' I've clicked and dragged four diagonal lines, one on each corner, to show I want to keep some of those areas. Then I tell it the areas to exclude with 'Marks to Remove'. You have to play around with it, adding some areas and removing others, until you're happy with the result.


Hit Return when you're happy with the result


Add a Picture Style>Compound Frame Black and a Picture Effect, Picture Effects>Reflection>Half Reflection 8 pt offset


Or, Picture Effects>Glow>Purple 18 pt glow, Accent colour 4


Thanks to Gleannie for letting me use her photo

Part 6 - Microsoft Office Exel 2010 (14).....


Friday, 26 June 2009

Office 2010 – Word IV

Blog from Word

I am just testing the automatic Blog post document option in Word 14. It took less than 20 seconds to set up.

Now let's see if it posts?

Apparently all I have to do is click Publish

Publish – Publish the post to the blog account so that other people can read it.

Well, I guess it tried. Acually it was uploaded to the Blogger site but was waiting as a draft.

The images were added later.


Next, Word continued...


Office 2010 – Word III

Word 2010 - Part 4 Insert/Screenshot

A really nice new feature of Word 14 is the Screenshot (screen capture) it is like having a Photoshop/photo editing program hidden inside Word. Screenshot is also included in PowerPoint 2010.

On the Insert Tab ‘click’ its icon to see a thumbnail preview of all windows showing on the desktop. Either select one or click Screen Clipping. Screen Clipping takes you to the desktop covered with a grey mask. Drag/Click the desired area, releasing the mouse automatically inserts the selection in the document.


Choosing one of the Available Screen Shots thumbnails from the dropdown is the real strength of the tool. It does everything for you. Click on the thumbnail and it inserts into the document opening the Picture Tools - Format Ribbon which is divided into:

  • Adjust
  • Picture Styles
  • Background Removal
  • Arrange
  • Size


Having inserted the image (in this case a yahoo messenger window) hovering the mouse over the various Picture Style effects shows a real-time preview in the document. In this case I’ve selected the Relaxed Perspective, white. I will cover Background Removal (a new and very cool feature) and Text Wrapping on another image (to follow...).


On the right of the Picture Styles section:

  • Picture Boarder – Specify the colour, width, and the line style for the outline of the selected shape.
  • Picture Effects – Apply a visual effect to the picture, such as a shadow, glow, reflection or 3d rotation.
  • Picture Layout – Convert to SmartArt Graphic.


Each option had its own dropdown menu with thumbnails and full preview in the document. In this case I’ve chosen Picture Effects>Glow>Orange, 18 pt glow, Accent colour 6. The effect can be customised, in this case Picture Effects>Glow>Glow Options:

  • Presets
  • Colour
  • Size
  • Transparency


The Adjust section of the ribbon consists of:

  • Corrections – Improve the Brightness, Contrast or Sharpness of the picture.
  • Color – Change the colour of the picture to improve quality or match document content.
  • Artistic Effects – Add artistic effects to the picture to make it look more like a sketch or painting.
  • Compress Picture – Compress pictures in the document to reduce its size.
  • Change Picture – Change to a different picture, preserving the formatting and size of the current picture.
  • Reset Picture - Discard all of the formatting changes you made to this picture.


Next, Word continued...