Monday, 20 July 2009
Office 2010 - Calendar Templates

Friday, 10 July 2009
Office 2010 - Publisher II

The text I will use it taken from the Microsoft Security Essentials home page. There are several reasons for returning to the page (it’s the same page used in PowerPoint IV). Firstly, the program, when it is released, will be free so there is no issue with advertising it. Secondly, the page has lived its short life, it appeared on June 23 to launch the limited (I think it was 75,000 downloads) beta version which in turn was limited to 3 specific countries. And lastly, I have the page bookmarked for later reference.
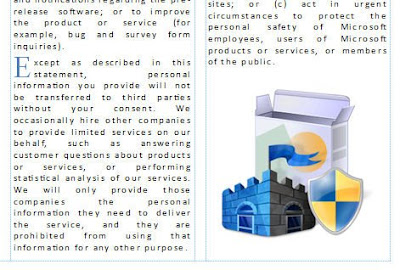
The intention is to fill the third box fully without adding anymore txt. Highlight the ‘W’ from ‘When’, the first letter of the first sentence, Text Box Tools > Format > Typography > Drop Cap. Click Drop Cap > Custom Drop Cap > Dropped > Size of letters: 4. Repeat the process for the first letter of the other two paragraphs changing the Size of letters: 2. Change the font of the three letters, W, E & M to Times New Roman and their colour to Accent 3 from the Scheme colours Home > Font > Font Colour.
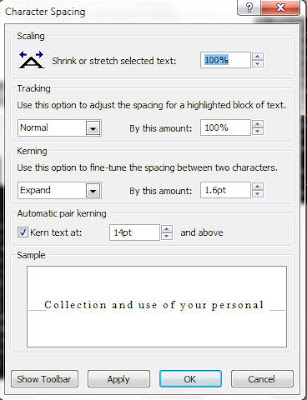
With all three paragraphs highlighted, including the heading, go to the Home Tab > Font > Character Spacing > More Spacing. From the dialogue box Character Spacing > Kerning > Use this option to fine-tune the spacing between two characters. Expand: By this amount: 1.6pt (sometimes you have to play around with it until you get the right size). The text will now have filled the third column.
From the Insert Tab add an image, Insert > Illustrations > Picture, drag the image to the space in the bottom right, resizing if necessary. Insert a text box for the title, Insert > Draw Text Box and type in the title. With the title highlighted set the font size to 36pt. In Drawing Tools > Format > Shape Styles choose an appropriate style, in this case Linear Up Gradient - Accent 1.
See how it looks
Thursday, 9 July 2009
Office 2010 - Publisher

What Microsoft Office Publisher does is put high quality desktop publishing software in the hands of small businesses and ordinary people producing posters, business cards, newsletters and a countless list of other media (actually the list isn’t endless so I’ll be showing a complete list of Publisher templates later). I won’t be using a template for the example that will follow after an overview of the program.
Home:
- Clipboard
- Font
- Paragraph
- Styles
- Objects
- Editing
Insert:
- Pages
- Tables
- Illustrations
- Building Blocks
- Text
- Links
- Header & Footer
In Office Publisher 2007, which didn’t have the Ribbon, Design Gallery Objects were/are accessible from the Insert menu, Insert > Design Gallery Object > Design Gallery. Office Publisher 2010, on the Insert Tab, has the Group Building Blocks. The categories of Building Blocks (Design Objects) are:
Building Blocks Library
- Advertisements
- Business Information
- Calendars
- Design Accents
- Page Parts
- Template
- Page Setup
- Layout
- Pages
- Schemes
- Page Background
Mailings:
- Start
- Write & Insert Fields
- Preview Results
- Finish
View:
- Views
- Layout
- Show
- Zoom
- Window
When a Placeholder (textbox) is selected the Drawing Tools and Text Box Tools Format Tabs are available.
Drawing Tools
Format:
- Insert Shapes
- Shape Styles
- Shadow Effects
- 3-D Effects
- Arrange
- Size
Text Box Tools
Format:
- Text
- Alignment
- Linking
- Effects
- Typography
In addition, when a picture is added, the Picture Tools Format Tab is available. Its Groups are:
Picture Tools
Format:
- Adjust
- Swap
- Picture Styles
- Shadow Effects
- Arrange
- Size
The Office (Publisher) Button
Info
The Save As options:
- Publisher Files
- Publisher Template
- Publisher 98 Files
- Publisher 2000 Files
- Unicode Text Files
- PostScript
- XPS Document
- Plain Text
- Single File Web Page
- Web Page, Filtered
- Rich Text Format
- Works 6.0 – 9.0
- Word 2007 Macro-enabled Document
- Works 6 – 9 Document
- Word 2007 Document
- Word 97-2003 Document
- GIF Graphics Interchange Format
- JPEG File Interchange Format
- Tag Image File Format
- PNG Portable Network Graphics Format
- Device Independent Bitmap
- Windows Metafile
- Enhanced Metafile
- Advertisements
- Award Certificates
- Banners
- Brochures
- Business Cards
- Business Forms
- Calendars
- Catalogs
- Envelopes
- Flyers
- Gift Certificates
- Greetings Cards
- Import Word Documents
- Invitation Cards
- Labels
- Letterhead
- Menus
- Newsletters
- Paper Folding Projects
- Postcards
- Programs
- Quick Publications
- Resumes
- Signs With Compliments Cards
General:
Change the most Popular options in Publisher.
- Top options for working with Publisher
- Personalise your copy of Microsoft Office
Proofing:
Change how Publisher corrects and formats text.
- AutoCorrect options
- When correcting spelling in Microsoft Office programs
- When correcting spelling in Publisher
Language:
Set the Office Language Preferences.
- Choose editing languages
- Choose display land Help languages
- Choose ScreenTip Language
Save:
Customise how documents are saved.
- Save documents
Advanced:
Advanced options for working with Publisher.
- Editing options
- Display
- General
Customise Ribbon:
Customise the Ribbon.
- Choose commands from:
- Customise the Ribbon:
- New Tab
- New Group
- Rename
- Restore Defaults
- Import/Export
Quick Access Toolbar:
Customise the Quick Access Toolbar.
- Choose commands from:
- Quick Access Toolbar:
- Restore Defaults
- Import/Export
Add-Ins:
View and manage Microsoft Office add-ins
- Add-ins
Trust Center:
Help keep your documents safe and your computer secure and healthy.
- Protecting your privacy
- Security & more
- Microsoft Office Publisher Trust CenterTrust Center Settings
Next, Publisher II


