Tuesday, 25 August 2009
Tuesday, 14 July 2009
Office 2010 - News

Yesterday, Microsoft began its ‘invitation only’, but none the less impressive, Technical Preview of the Office 2010 package. Still no mention of that underestimated little word, price. The price will be a major concern for anyone who already owns Office 2007 especially considering that it doesn’t do anything fundamentally different and there is also the less glamorous but still functional OpenOffice Suite for free.
Online Office
Office 2010 will also be available in an online version, albeit reduced. The programs that will be available are Word, Excel, PowerPoint and OneNote. Use of the remote Office will also be compatible with Safari and Firefox. The fact that they were not really highlighting of the online version of Office 2010 is more a response to Google docs rather than a shift in emphasis from the software package. As I understand it you will need a Windows Live account to access it but there’s no cost involved even for non-Office users, though one if its main attractions is the ability to collaborate with other Office 2010 licence owners.
The Office 2010 web applications will have a restricted functionality but more than enough to make adjustments to existing documents including using formulas in Excel and adding web clips and the like to OneNote. We will have to wait for the full release of Office 2010 to try out the web-based features which are not available in the Technical Preview though, apparently they will be available later this year. You can read more about it from their site, here.
Next, SharePoint Workspace...
Friday, 10 July 2009
Office 2010 - Publisher II

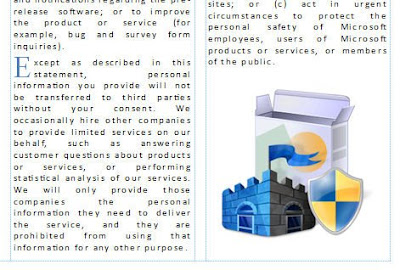
The text I will use it taken from the Microsoft Security Essentials home page. There are several reasons for returning to the page (it’s the same page used in PowerPoint IV). Firstly, the program, when it is released, will be free so there is no issue with advertising it. Secondly, the page has lived its short life, it appeared on June 23 to launch the limited (I think it was 75,000 downloads) beta version which in turn was limited to 3 specific countries. And lastly, I have the page bookmarked for later reference.
The intention is to fill the third box fully without adding anymore txt. Highlight the ‘W’ from ‘When’, the first letter of the first sentence, Text Box Tools > Format > Typography > Drop Cap. Click Drop Cap > Custom Drop Cap > Dropped > Size of letters: 4. Repeat the process for the first letter of the other two paragraphs changing the Size of letters: 2. Change the font of the three letters, W, E & M to Times New Roman and their colour to Accent 3 from the Scheme colours Home > Font > Font Colour.
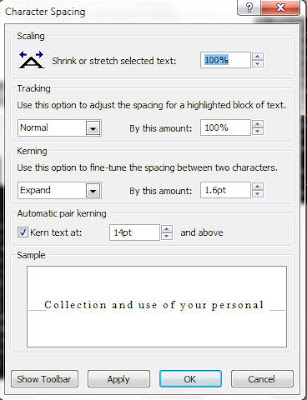
With all three paragraphs highlighted, including the heading, go to the Home Tab > Font > Character Spacing > More Spacing. From the dialogue box Character Spacing > Kerning > Use this option to fine-tune the spacing between two characters. Expand: By this amount: 1.6pt (sometimes you have to play around with it until you get the right size). The text will now have filled the third column.
From the Insert Tab add an image, Insert > Illustrations > Picture, drag the image to the space in the bottom right, resizing if necessary. Insert a text box for the title, Insert > Draw Text Box and type in the title. With the title highlighted set the font size to 36pt. In Drawing Tools > Format > Shape Styles choose an appropriate style, in this case Linear Up Gradient - Accent 1.
See how it looks
Wednesday, 8 July 2009
Office 2010 – PowerPoint IV
Office PowerPoint 2010 – Continued
Having chosen the slide format from Page Setup, (see Office – PowerPoint III) click on View Tab > Master Views > Slide Master. Formatting the background, Text format and images individually will take time so we use the Slide Master to make a Master Slide whose characteristics will appear in every slide in the presentation.
The Slide Master Tab Groups are:

- Edit Master
- Master Layout
- Edit Theme
- Background
- Page Setup
- Close
It is important to close the Slide Master before adjusting individual slide content otherwise the content will be added to every slide in the presentation.
The subject of the presentation is Microsoft Security Essentials. The program, originally codenamed ‘Moro’ (most Microsoft applications have pre-release names) was released in beta version last month (June 23) in a small handful of countries.
The small handful is in fact three countries, United States (Microsoft’s home base) Israel (where the ‘Morro’ development team are) and Brazil (Microsoft’s target launch market). The version I use was ‘borrowed’ from the internet (series of tubes).
Microsoft Security Essentials (beta version) is a free Anti-virus/Malware/Spyware suite and successor to Windows Live OneCare and will allegedly be released by the end of 2009.
On the Slide Master Tab I prefer to set the background and images before setting the text format, that way you can see how the text will look against the background that will be constant throughout the presentation.
Fill – Tan, Text 2, Outline – Background 2
I will use text directly from the beta website to describe the program, (I will review it fully closer to its release date) and add slides from Home Tab > New Slide when needed.
Having added the text go to the Transitions Tab > Transition to This Slide, my own preference is the Checkerboard. A Transition is the animation which moves from one slide to the next. To keep it simple and to save time (it’s also a nice effect) I will keep the same Transition throughout the presentation by clicking Apply to All. In Effect Options I selected ‘From Top’ (the other option being 'From Left').
Tuesday, 7 July 2009
Office 2010 – PowerPoint III
Microsoft Office PowerPoint 2010 – Continued
Before I look at how to create a presentation in PowerPoint here are the options from the Office Button.
The Office (PowerPoint) Button:
Info

General options for working with PowerPoint.
- User Interface options
- Personalise your copy of Microsoft Office
Proofing:
Change how PowerPoint corrects and formats your text.
- AutoCorrect options
- When correcting spelling in Microsoft Office programs
- When correcting spelling in PowerPoint
Save:
Customise how documents are saved.
- Save presentations
- Offline editing options for document management server files
- File merge options for shared document management server files
- Preserve fidelity when sharing this presentation:
Language:
Set the Office Language Preferences.
- Choose editing languages
- Choose display and Help languages
Advanced:
Advanced options for working with PowerPoint.
- Editing options
- Cut, copy and paste
- Chart
- Image Size and Quality
- Display
- Slide Show
- When printing this document
- General
- Web Options
Customise Ribbon:
Customise the Ribbon.
- Choose commands from:
- Customise the Ribbon:
- New Tab
- New Group
- Rename
- Restore Defaults
- Import/Export
Quick Access Toolbar:
Customise the Quick Access Toolbar.
- Choose commands from:
- Customise Quick Access Toolbar:
- Restore Defaults
- Import/Export
Add-Ins:
View and manage Microsoft Office add-ins.
- Add-ins
Trust Center:
Help keep your documents safe and your computer secure and healthy.
- Protecting your privacy
- Security & more
- Microsoft PowerPoint Trust Center
- Trust Center Settings
For now I will be starting a presentation from scratch although I can add a theme at any point from the Design Tab.
Save
Before I do anything to anything I will give it a name and save it. Although PowerPoint hasn’t crashed here it has crashed several times whilst running the 32bit version on a 64bit drive. Having crashed, the program restarted itself with a list of last saves and auto saves to choose from.
Regardless of PowerPoint having its own safety net, most Office 2010 applications do; exceptions being OneNote saves everything and Access database entries are automatically updated, I like to know where a document is and its name.
A logical place to keep the file is My Documents > Office > PowerPoint and a descriptive, appropriate name for it is, in this case ‘officetwoten.pptx’. It has been saved with PowerPoint’s default PowerPoint Presentation format.
The complete list of Save As options are:
- PowerPoint Presentation
- PowerPoint Macro-Enabled Presentation
- PowerPoint 97-2003 Presentation
- XPS Document
- PowerPoint Template
- PowerPoint Marco-Enabled Template
- PowerPoint 97-2003 Template
- Office Theme
- PowerPoint Show
- PowerPoint Macro-Enabled Show
- PowerPoint 97-2003 Show
- PowerPoint Add-In
- PowerPoint 97-2003 Add-In
- PowerPoint XML Presentation
- Single File Web Page
- Web Page
- Windows Media Video
- GIF Graphics Interchange Format
- JPEG File Interchange Format
- PNG Portable Network Graphics Format
- TIFF Tag Image File Format
- Device Independent Bitmap
- Windows Meta File
- Enhanced Windows Metafile
- Outline/RTF
- PowerPoint Picture Presentation
- OpenDocument Presentation
Page Setup
The first thing I would do having saved the presentation is decide the slide format. For me there is no choice to be made, if there is the possibility to present something in 16:9 format, I will use it.
Golden mean
The Golden mean (Golden section/Golden ratio) in both mathematics and art are the proportional qualities of the whole in relation to the section divided from it when the larger (whole section) is the same proportion as the smaller section. There are no, to the best of my knowledge, aesthetic or mathematical values to the 4:3 ratio (unless your screen is that proportion and you want to fill it).
- On-screen Show (4:3)
- On-screen Show (16:9)
- On-screen Show (16:10)
- Letter Paper (8.5x11in)
- Ledger Paper (11x17in)
- A3 Paper (297x420mm)
- A4 Paper (210x297)
- B4 (ISO) Paper (250x353mm)
- B5 (ISO) Paper (176x250)
- 35mm Slides
- Overhead
- Banner
- Custom
Monday, 6 July 2009
Office 2010 – PowerPoint II
Microsoft Office PowerPoint 2010 (Presentation)
A screen recording using PowerPoint 14
Sunday, 5 July 2009
Office 2010 – PowerPoint
Microsoft Office PowerPoint 2010

There are, of course, alternatives to Microsoft Office applications and later I will be comparing them with their Open source counterparts, the most attractive, and probably the only plausible one, being the OpenOffice project. Having previously only produced presentations using Office PowerPoint 2003/07 I’m looking forward to see how OpenOffice Impress compares to PowerPoint, not to mention the other OpenOffice applications.
PowerPoint started its life as Presenter, owned by the Forethought Company in California. In 1987 it was released as PowerPoint for the Mac, later that same year it was acquired by Microsoft and ever since has been used widely and is still considered the most effective form of persuasive technology by many.
One ironic fact about PowerPoint and other presentation software is that they use what are known as ‘slides’. Slides themselves, and slide projectors, were made obsolete by the use of programs like PowerPoint for slide presentations.
- Clipboard
- Slides
- Font
- Paragraph
- Drawing
- Editing
- Tables
- Images
- Illustrations
- Links
- Text
- Symbols
- Media
- Page Setup
- Themes
- Background
- Preview
- Transition to This Slide
- Timing
- Preview
- Animation
- Custom Animation
- Timing
- Start Slide Show
- Set Up
- Monitors
- Proofing
- Language
- Comments
- Compare
- OneNote
- Presentation Views
- Master Views
- Show
- Zoom
- Colour/Grayscale
- Window
- Macros
- Custom Toolbars
Drawing Tools (Appears when an object is selected)
Format:


